Budapest Campaign - Operation Debrecen
Budapest Campaign – Operation Debrecen

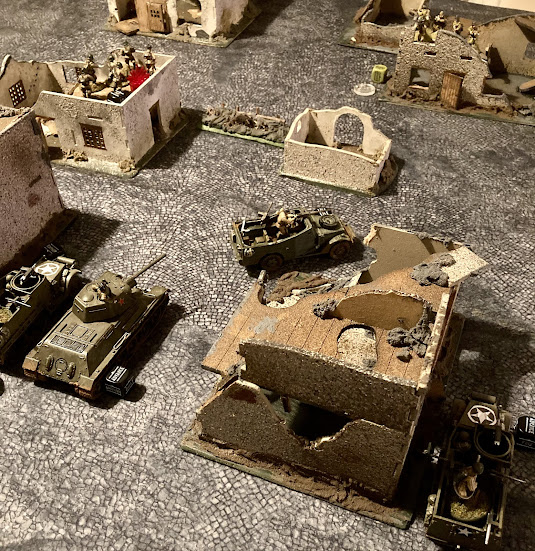
Hot off the back of my inept showing in failing to finish off Ensign Bozsoki and claim victory at the Salt Baths its time to report on Scenario 3 of the Budapest Campaign. As before this battle was fought over a couple of hours round the Scot’s house. The table for today was the first run out of a collection of modular boards which are looking really good. For those interested the road sections are my hurried attempt at the technique shown by Little Wars on their youtube terrain channel. They could be prettier but the technique is easy and effective. Once again I’ve laid this out in Battle Chronicler.
Scenario 3 – Operation Debrecen – 1250 points
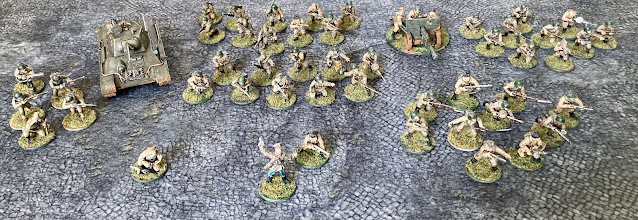
Soviet Guards Armoured Platoon:
T-34 Platoon. 3x regular T-34. Pl Comd has poor radios.
Tank Rider Platoon (-). 2x Veteran nine man sections each with a single LMG. 1x Veteran five man section with no LMG.
SU-76. Regular.
Zis-3 Divisional Gun. Veteran.
Truck. Inexperienced.
Wehrmacht Panzer Kampfgruppe:
PzIV Platoon. 3x regular PzIV with schurzen.
2x Hanomag. Regular.
2x Grenadier sections. Veteran, 1x LMG, 2x AR, 1x PzFaust.
Soviet Force Selection. So life rather got in the way of preparing in any way for this punch up which is why the list is largely that I brought to the last battle. I dropped out the Tokarev and Bren Carrier as they looked like free points for the PzIVs to snaffle. The Zis-3, and a cheap tow for it, seemed a sensible replacement to get another AT gun into the list. The logic behind the small veteran section was that I wanted to free up points to up-gun two other sections to Veteran - these would dig in around the bridge and make it hard for the Axis to seize the objective. Therefore I reduced one squad in size, so good so far, then I had an attack of dumb and wasted 40 points on LMGs for the two defensive squads on the logic that this meant they could reach out from the bridge area and start causing some damage to the advancing Germans. Sort of sensible but at the end of the last battle I concluded I needed to take AT grenades, the LMGs stopped me doing this – would I regret it? Guess…
The Soviet Plan. Simple plan: I’ll dig a couple of nails SMG toting veterans in at the bottom of the river bed. I’ll then exploit my dice pull advantage to allow my T-34s, SU-76 and Zis-3 to fire first and pin the PzIVs in position if not kill them. This would neatly force the Scot to chuck his veterans at the objective where my tough fighting Tank Riders would beat them off and deliver me the bonus points for the mission and an easy victory. If I could keep my squishier bits of kit alive this would give me a comfortable win. All this would be aided by concentrating my superior number of admittedly inferior medium AT guns on shooting up one PzIV at a time. Easy!
Deployment

Deployment. Deploying first I had to setup in all-round defence. I kept the SU-76 with its super thin armour and one T-34 off the board. Also skulking was the truck and the five man squad – I was beginning to realise that they were only going to have one practical use; namely being held in reserve to be thrown onto the objective should I need to contest it on Turn 6. Not a good use of points. On the bridge site I placed the T-34s and Zis-3 covering all angles while the infantry deployed in the river valley with only their LMG gunners up at the lip of river bank. It felt like a pretty good setup. Worth noting that we agreed the river was fordable throughout its length but would be difficult ground. The Scot then deployed his four units. Two PzIVs concentrated from the east supported by an empty Hanomag while a brisk-marching Grenadier squad setup ready to start to advance on the Zis-3. The Soviets are surrounded.

The Soviets set up their perimeter around the crossing point.

The river bed is excellent cover making a strong defensive position.
Turn 1

Turn 1. Running around after shiny things. Turn 1 started exactly as I would have hoped. Soviets pulled first and the eastern T-34 immediately put a round into the southern PzIV, igniting its bomb load and setting it on fire. Before I could start feeling sorry for the Scot his crew decided this was a non-issue, made a brew on the flames before sorting themselves out and getting on with the fight. The northern PzIV attempted to extract vengeance but missed. Flushed with confidence my second T-34 got cocky and, rather than stay in the perfect hull down position it had deployed in, pulled forward so that it could have a go at the Grenadiers advancing in the open as well as the now burning PzIV. The result was underwhelming with only a single axis infanteer killed and another pin on the PzIV. Axis were up next and the Hanomag crept forward to engage the Zis-3 whose crew had their backs to it. The transport killed one of the gun crew whose fellows hastily trotted the gun round to face the armoured threat. Finally the western tank rider section ran out the river bed to the rocks to head off the advancing grenadiers. Clearly feeling a bit spooked these Grenadiers fell back into the wood. All round I ended Turn 1 feeling pretty confident.

The western Tank Riders and their supporting T-34 get over-excited by the approaching Grenadiers.

The T-34s make a promising start...
Turn 2

Turn 2. Uri cant shoot straight. At then end of Turn 1 we read the rules for reinforcement with a bit more care and had a discussion that it seemed a little unfair that the Soviets could now choose where to bring on their second wave. It seemed to us that, as with Scenario 2 for the Soviets, the Axis were being asked to assault with no advantage of bombardment or points and therefore the odds were against them. Still, rules is rules so the Soviets drew first and Zis-3 tried a shot on the un-pinned northern Pz IV which was clearly the greatest threat this turn. It missed, dramatically. Soviets drew second and the western T-34 made a re-show of the previous turns shooting, poor though last turns effort was this time T-34 crew really showed their lack of training with no hits on the Grenadiers in the wood and an impressively wayward shot against the PzIV. On a roll the Soviets drew a third die and the eastern T-34 at the river also made an shot at the unpinned PzIV…missing. Three heavy weapons fired and not a pin in sight, ho-hum. Happily there was something in the air clearly as the German tank failed to hit in return. With the most dangerous German tank now complete for the turn the Soviet first wave entered from the east with the SU-76 lining up for a point blank shot on the burning PzIV. The SPG hit, penetrated and stunned the crew. Progress but not much. This failure was irritating as had I destroyed this PzIV it would have given me both a powerful overlap on tanks and also knocked out the empty Hanomag while also letting me bring the Pl Comd T-34 on behind the northern PzIV to catch it between two of my own tanks. However, with the SU-76 failing the Scot brought the Hanomag back round and had the cheek to pin it with the transport’s pintle mount. Now confident that the SU-76 commander did not have matters under control I brought the Pl Comd T-34 on in the south eastern corner to finish the job. Despite being a few yards behind his quarry, which was helpfully marked by the fire of the rest of the Pl, Lt Uri missed, even more dramatically than his inept subordinate. Turn 2 had not been the crippling armoured strike I intended - I reached for a beer.

The Zis-3 team begin the firepower demonstration (or lack thereof)...

...setting the tone for the rest of the Pl.
Turn 3

Turn 3. Fail to plan, plan to fail. So far the Soviet defence had been broadly logical but executed with little fortune. Turn 3 threw up a conundrum that I could have avoided had I actually made a plan for this fight. I had a firm grip of the objective and therefore could now nominate where the Axis reinforcement could enter the fray. However, as I had not bothered to think about this in advance I had a choice between giving the flank/rear of at least two of my vehicles to the incoming PzIV regardless of which edge I chose. Crossing my fingers I nominated the western edge to try and keep the threat at arms-length from the largest concentration of my assets. Axis drew first and the third PzIV steamed in, lined up the flank of my western T-34 and despatched it with a single shot. Oh well, a silly gamble but I’d just need to wrap up in the East and then sweep westward over the bridge. The next dice was Soviet and Lt Uri couldn’t miss at this range twice could he…yup, not sure where the round went but it certainly wasn’t into the ludicrously easy target to his front. Anyway moving swiftly on from the poor training of armoured officers in the Guards the German northern PzIV engaged the T-34 at the bridge setting it on fire but failing to knock it out. The Hanomag had a change of heart about hanging out in the tank fight and pulled round the hill to engage the Zis-3 again. It killed a crewman and sent the surviving Soviet gunner fleeing for his life (unfortunately I, and by extension the soldier in question forgot all about the ‘Great Patriotic War’ rules). The SU-76 was my last heavy weapon able to act but it remained superbly placed to finish off its target. Another dazzling display of gunnery later and the PzIV had another burning fuel tank, a total of six pins and a highly stoic crew who were appearing to enjoy their unseasonably hot day out. Finally the Germans advanced the second Hanomag, loaded with Grenadiers, down the road towards the bridge.

Strong shooting from the new arrival.

While Uri has a shocker.

And the SU-76 does little better.
Turn 4

Turn 4. Making matters worse. Soviets were first out the bag and the SU-76 tried to finish what it had so comprehensively fire-started. Miss…although looking at the photos again this might have been hit as it was point blank. In the centre I was nervous about the eastern PzIV closing in on my centre and so moved east trying to engage the northern PzIV in the process but shot wide. In response this tank advanced and placed a pin on its attacker. Soviets drew again and I made another error. The Pl Comd tank, instead of engaging the nearest PzIV which had still to activate, went for the northern PzIV but only pinned it. With no further threats the tea-drinking southern tank crew had a brisk team talk, rallied their pins away and got ready to make progress. Meanwhile in the west the PzIV and Hanomag advanced and began putting pins on the Soviet infantry who had now been abandoned by their armoured support.


The competition for title of most incompetent Soviet gunner intensifies.

Turn 5

Turn 5. Not pulling it back from the brink. The Axis pulled first and the newly rallied PzIV engaged the flank of the Pl Comd T-34. The shot hit, penetrated and then only immobilised the Russian tank. Soviets were out the bag next and the SU-76 lined up on the norther PzIV. Finally, the crew seem to have got the hang of things again punching thought the PzIV side armour to knock it out. Unfortunately, the Axis drew next and the centre T-34 was unable to escape from its rear-on position to the western PzIV which speedily put it out of action. In the centre the remaining squad ran to get under lee of cliffs to try and stay in position and contest the objective. In the West though I had a Veteran Infantry section now down to five men stranded in the open who needed to be the biggest speed bump they could. Sadly it was a tall ask as the Hanomag trundled down the road and the Veterans on board charged out and overpowered the Tank Riders (we shouldn’t have run this as an assault straight from the transport but I don’t see point blank fire from the squad de-bussing yielding a different result anyway).

Aggressive staring gets Uri nowhere.

But the SU-76 finally makes some progress.

The hour is getting late for a Soviet comeback as the German Pl Comd drives for the bridge.

And the Grenadiers overrun the first section of Tank Riders.
Turn 6

Turn 6. Ignominy. Turn 6 was going to come down to trying to scrabble points. Despite having now lost a couple of units the Soviets drew first and Lt Uri tried for redemption. With an almost weary sigh the gunner lined up on the southern PzIV and pulled the trigger. To everyone’s surprise after being set on fire twice and shot at half a dozen times the PzIV finally brewed up. The SU-76 tried for a long range shot at the western Hanomag but missed. With no AT grenades the Veterans under the cliff went to ground contesting bridge as the third PzIV and the Hanomag advanced down the river back to spray MMG fire into the water. Finally the Grenadiers ran onto the bridge. The last movers were the arrival onto the board of the truck with its five tank riders – who hid impotently behind a hill. The Hanomag near the Soviet Pl Comd surrendered. With Turn 6 the game ended. The objective was contested but the Germans had knocked out four Soviet units (2x T-34, one Vet section and the Zis-3) for the loss of three axis ones (2x PzIV and 1x Hanomag). A close Axis victory (yeah I know the book says it take two clear points to make a win but draws are boring).

Uri comes good in the end. Too little, too late.

The Soviets control the eastern bank..

But the west bank is German and its looking bleak on the crossing site.
2-1 to the Wehrmacht so far.
Post-mortem. A bit of a litany of errors on my part I think. In force selection I totally failed to learn from the very clear lesson of last time and give my Veterans who would have to hold the objectives AT grenades. The logic of giving LMGs to generate a few pins was sound but didn’t outweigh the opportunity presented by enabling them to take on the German armour – given the requirement for the Wehrmacht to come to the objective these sections should have stayed hidden in the river bed until they could assault out with satchel charges and pointy sticks at anything trying to secure the objective. Deployment of my initial force was sound; however, I let things get away from me. The decision to bring my reinforcements on from the east behind the Axis armour was sound but it should have been obvious to me from the beginning that I could make a trap for the Axis reinforcement by forcing him on from the west into fire from the Zis-3 (which could have gone on ambush rather than turning round) and the western T-34 who could have stayed hull down on the river bank. The threat to my Zis-3 from the advancing Grenadiers was already negated by the movement of one of my Tank Rider sections. They could have easily shielded the bridge from the cover of the rocks – if they were supported by a living T-34. By advancing the T-34 to try and hit the Grenadiers on Turn 1&2 if offered up my tank flank for no critical advantage. On balance I think this scenario is stacked in favour of the defender and I kind of blew it…

Comments
Post a Comment