Budapest Campaign - Attila Line
Budapest
Campaign – The Attila Line

After a long, work-induced, delay we’re back with scenario five of the Budapest Campaign. 3-1 to the Axis so far after another failure by the Soviets to break through in the great turkey shoot in Flak Regt 133’s killing area. Lt Uri is back for another frontal assault but, understandably, hasn’t been trusted with another shiny new tank platoon…
Scenario
5 – The Attila Line – 1250 points – Soviets vs Hungarians.
Soviet
Forward Detachment Reconnaissance Platoon:
M3 Half Track. Regular - 1x HMG.
Mounted Recce Section. 8x Veterans - 6x SMG.
Medic. Veteran.
M3 Half Track. Regular - 1x HMG.
Mounted Recce Section. 8x Veterans - 6x SMG.
2Lt. Inexperienced.
White Scout Car. Regular - 1x HMG.
Mounted Recce Section. 8x Veterans - 6x SMG, 1x flamethrower.
Universal Carrier. Regular – 2x LMG.
Mounted Recce Section. 5x Veterans, 1x LMG.
T-34/76.
Regular.
T-34/85.
Regular (free).
BA64
Dshk. Regular – 1x HMG, closed top.
BA64
Dshk. Regular – 1x HMG, closed top.
Note.
The FDRP list does not give M3 Half Tracks as an option but the descriptive text specifically mentions them so we’ve included them.
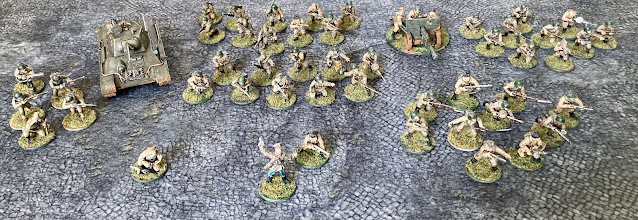
Hungarian
Generic (restricted Para) Platoon:
Maj
Tassonyi. Veteran - x2 runners (free).
Parachute
Infantry Section. 12x Veterans, 1x LMG, 2x PzFaust.
Parachute
Infantry Section. 12x Veterans, 1x LMG, 2x PzFaust.
Parachute
Infantry Section. 5x Veterans.
Puma
Armoured Car. Regular.
Panzer
IV. Regular.
Pak
40. Veteran.
MG42
Team. Regular.
Sniper
Team. Regular.
Pancelrem
Team. Regular.
Soviet
Force Selection. Another frontal assault mission with open terrain.
For the Soviets victory is going to come from stacking up within 12” of
the Hungarian table edge. To get there it’ll be a sprint across the open;
this time no 88s, but some significant obstacles which is going to force me to
punch through the paras in trenches. Given how tough Hungarian Parachute
Infantry are at close quarters it’s probably better to take a Tank Platoon into
this fight then hunker down in the Hungarian deployment zone. However,
Uri’s track record with tanks is poor and it’ll be more interesting to crack a
different list selector. I’ve maxed out on the number of veteran squads I
can fit in my available transports. If these can get into 12” end zone
and then go to ground it’ll be challenging for the Hungarians to wipe them
out. The scenario gives a free T-34 and it seems a no brainer to add
another one. The BA64 pair is a bit of an experiment. The HMGs
should help killing off paratroopers but will also allow them to get pins on
the Hungarian armour which could be useful when stacked with the HMGs on the
transports. I’m not expecting much from the Pl Comd or the medic; instead
their function will be to hunker down in their transports in the 12” zone to
prevent the auto-surrender of the transport if I lose a squad while also
netting another three points.
Soviet
Plan. With the Recce Platoon selector closing the distance
across the board shouldn’t be an issue but the transports are going to get a
thorough slapping from the support weapons the Hungarians have available.
The basic plan will change depending on how the Scot deploys. My
assumption is that he can take one of two approaches. He can use
all his obstacles on one flank with light defence on this side while his
infantry largely deploy in trenches blocking the other flank, in this case his
armour will be held centrally to be able to react. The other option is
that he goes largely symmetrical with even distribution of his infantry and
mines across both flanks, again likely that the axis armour will remain
central. Either way my intent is going to be to go for an envelopment
move down a single flank. I will aim to avoid having to clear through the
mass of his parachute infantry in their trenches if I can. If he over
relies on the mines and leaves one side over-weak then I’ll go for that side
and push through the minefields if necessary. The critical weakness I
have is the number of decent anti-armour weapons to knock out the Puma and Pz
IV. I’m going to focus on pinning these as early as possible using my
HMGs and try and knock them out with the T-34s. Once that’s achieved I
can turn on the infantry. The biggest decision will be when to dismount
and advance on foot.
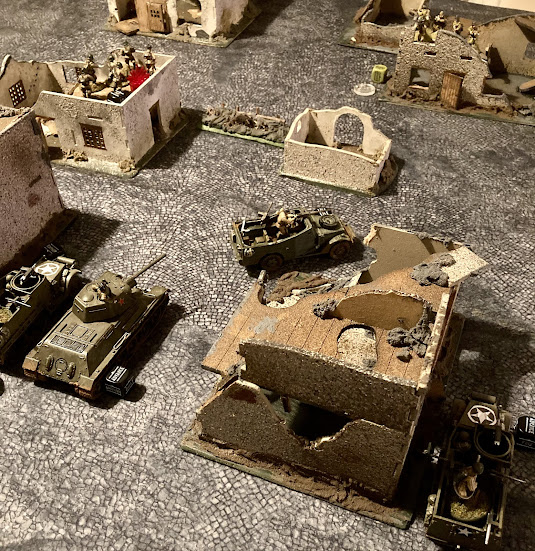
Deployment

Deployment. As required the Scot kicked things off by deploying his minefields and then entrenching his force. Unsurprisingly he placed both minefields together and chose the western flank managing to completely close off the channel on that board edge. Despite this the flank was not left unguarded with a Parachute Section dug in covering the minefield at PzFst range. These paras were backed up by the Pak40 in its gun pit. This pairing covered the obstacles with fire putting an effective block on the western flank. The eastern flank therefore had no mines but instead received the bulk of the Scots troops. The second large para section dug in across the eastern channel. Behind them, positioned to fire over their trench, was the Hungarian Pancelrem (bazooka) team in a gun pit while the sniper was tucked into the craters nearby. This blocking force was supported by the Pz IV which tucked itself in behind the central wood orientated to flank shot any vehicle moving through the gap. This tank was supported by the small para section. In the centre Maj Tassonyi tucked himself into the wooded hill with his MMG team ready to move to support whichever flank got Soviet attention. Finally, held in the Major’s pocket as a reserve and also as a guard on the road was the Puma - hidden behind the central hill.
The Soviets exploited the FDRP to roll onto the board 12” prior to the game beginning. I stacked the eastern flank with everything - not subtle but it seemed the lowest risk route. An attack on the western side would either require every one of my flimsy transport vehicles to accept a risk of mine strike or my infantry would need to assault on foot into the face of a para section supported by the MMG and Pak 40. The eastern flank would expose me to greater threat from the Pz IV and Puma but would allow my transports to get forward fast and flood the eastern objective zone with Soviets. This option seemed a clear favourite as aggressive mounted assault early would secure the initiative and force the Hungarians to come and get rid of me.
To that end the Soviet spear tip poured onto the eastern flank with the half tracks and scout car in the lead and the T34s shielding them and hoping to get a bead on the Pz IV. The BA64s dropped in on the left flank to screen and guard the heavier armour from the Puma’s attention.


Turn 1. Zero flash to bang. Not surprisingly given the dice overlap Soviets were first out the bag and started by having the T34/85 go into ambush in what was, with hindsight, an act of gross optimism hoping to catch the Pz IV advancing out of its position of ambush. The Soviets stepped off by advancing the first of the transports - the half track with a section and the medic. Much to Soviet surprise this was met by the Hungarians storming out of their trench to assault. The startled HMG gunner on the half track managed to kill one para before the recce men had to pile out and fight. In the assault the paras won in a close struggle losing three more of their number. Having seen the paras wipe out the recce section the medic sensibly surrendered and the half track would also go if the paras could not be cleared out by the end of the turn. I hadn’t expected this aggression so early but it did now place one of the meaty para sections in an easier position to be removed. Therefore the next half track advanced and engaged the paras before the recce section on board devised at point blank range and also opened up. The end result was the eastern para section being reduced to three heavily pinned troopers who surrendered. With the front line now stabilised the White Scout Car and Universal Carrier moved up supported by the T34/76. In response the Hungarian sniper picked off a recce trooper while the Pancelrem missed a half track. The Pz IV was unable to see the T34 and made the most of things by engaging a half track, hitting, penetrating but then only managing to stun the crew. The centre and west was quiet as the western defenders began to re-balance to support their left flank. The large western para section ran up onto the wooded hill to join Maj Tassonyi. The Pak 40 crew manhandled their gun round and wheeled it up onto the hill. The final Soviet move was in the centre with the BA64s advancing to screen the main body but failing to find any targets in the gloom.


 Maj Tassonyi holds an impromptu O group in the woods.
Turn 2. Break in. The turn started with a flare going up and bathing the field in light. Clearly the Soviet fire plan had come good as this would now allow the eastern spear tip to exploit its concentration of force by engaging freely. The turn started with a Russian pull of the dice as I pushed a transport forward to the trench to provide cover for the infantry to advance, the gunner attempted to pin the Pz IV which was now revealed tucked behind the wood. The HMG hit but the regular crew ignored the ineffectual knocking on their plating. Soviets drew again and Uri decided to get on with things. The T34/76 advanced and swung round the end of the AT ditch to line up on the Pz IV. The gunner laid, fired and watched with mild amazement as the Pz IV was torn apart by a huge explosion. Feeling more more comfortable about advancing now the eastern Soviets launched forward with a section sprinting to dive into the now empty trench. These dismounts were supported by the remaining transports who advanced and tried to engage the sniper and Pancelrem teams with little effect. In response the Pancelrem missed a half track but the sniper team managed to pick off a one of the section who had occupied the Hungarian trench. Meanwhile the Hungarian west flank was closing in to join the fight. The Pak 40 engaged the T34/76 who had destroyed the PzIV, taking revenge and knocking it out with a first round hit. Maj Tassonyi sprinted across the open ground to take cover behind the burning Pz IV while the western para section followed more cautiously. The MG42 put pins on the eastern BA64 but failed to damage it. Finally the Puma pulled forward and tried to knock out the other BA64, but missing. However, this attempt had left the Puma exposed in the flare-light in front of the T34/85 which promptly despatched it.
It had been a brutal round with three AFVs knocked out all in single engagements. The loss of a T34 was a blow to the Soviets but the destruction of both the Pz IV and Puma left the Hungarians very thin on long range firepower.


Turn 4. Tassonyi calls for fires. For the first time since Ojtozi pass things are looking grim for the Hungarians. This turn saw yet another flare go up and another assault from the Soviets to start the turn. This time the sniper pair were attacked by a recce section but the stoic sharpshooters held their nerve and shot down two attackers before they reached the craters. The assault was still one sided though with the plucky pair being overwhelmed. The rest of the Soviet east flank consolidated with transports and dismounts moving up to reach the objective zone. Seeing the Soviets concentrate Tassonyi called for artillery support to fix the attackers ready for an assault. With Axis batteries laying to his target he pulled his remaining paratroopers together read to try and push the Soviets back. The Soviet response in the centre was muted with the BA64s and T34/85 failing to target the infantry in the central wood.


 But Tassonyi has no voice but to order his paras forward to assault.
Turn 6


Turn 7.


So, Uri has made a bit of progress but we’re still a long way from clearing Budapest…

Comments
Post a Comment